
Chapter 1 Lesson 2 - Private Capabilities
Alright, we’re back. Yesterday was fun… not. Today doesn’t get any better. Private capabilities, woooooohoooooo!
What are They?
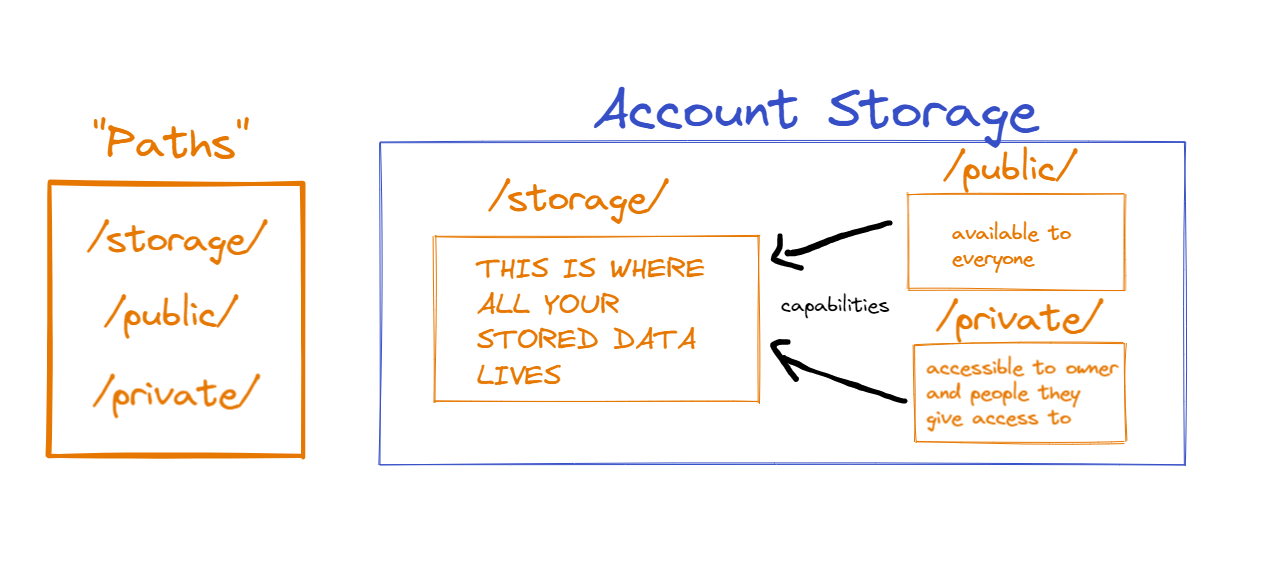
If you took our Beginner Cadence Course, you’ll remember this picture of capabilities:
Quick review:
/storage/is only accessible to the account owner. We use.save(),.load()and.borrow()functions to interact with it./public/is available to everyone./private/is available to the account owner and people who the owner gives access to.
The /private/ part is where private capabilities come in. Private Capabilities make it so that an account owner can give people specific access to their account.
When Would We Use Them?
We should use private capabilities when we want to give certain people or things special access to a resource in our account. Here are some scenarios:
- You want to give a marketplace contract the ability to withdraw NFTs from your storage when someone buys an NFT from you, so only the contract should be able to withdraw.
- You want to give a fellow community manager Admin rights over your NFT Collection so they can also mint NFTs, so only the community manager can mint.
- You want to give a friend the ability to withdraw NFTs from your NFT Collection because you trust them, so only your friend can withdraw.
You will be doing the second scenario in the next section.
NFT Example
As we learned in the previous lesson, you need a place to store the capability. Think of private capabilities like a key that you pass around only to certain people so they can unlock functions on a resource in your account. If you don’t have the key, you don’t have access to whatever it is the key would give you.
The Old Way to Give Admin Rights
Let’s take a look at a (non-official) NFT contract:
			pub contract ExampleNFT {

    pub var totalSupply: UInt64

    pub resource NFT {
        pub let id: UInt64

        init() {
            self.id = self.uuid
            ExampleNFT.totalSupply = ExampleNFT.totalSupply + 1
        }
    }

    pub resource interface CollectionPublic {
        pub fun deposit(token: @NFT)
        pub fun getIDs(): [UInt64]
        pub fun borrowRecordNFT(id: UInt64): &NFT?
    }

    pub resource Collection: CollectionPublic {
        pub var ownedNFTs: @{UInt64: NFT}

        pub fun withdraw(withdrawID: UInt64): @NFT {
            let token <- self.ownedNFTs.remove(key: withdrawID) ?? panic("missing NFT")
            return <- token
        }

        pub fun deposit(token: @NFT) {
            self.ownedNFTs[token.id] <-! token
        }

        pub fun getIDs(): [UInt64] {
            return self.ownedNFTs.keys
        }

        pub fun borrowRecordNFT(id: UInt64): &NFT? {
            return &self.ownedNFTs[id] as &NFT?
        }

        init () {
            self.ownedNFTs <- {}
        }

        destroy() {
            destroy self.ownedNFTs
        }
    }

    pub fun createEmptyCollection(): @Collection {
        return <- create Collection()
    }

    pub resource NFTMinter {
      pub fun mintNFT(): @NFT {
        return <- create NFT()
      }
    }

    init() {
        self.totalSupply = 0
        self.account.save(<- create NFTMinter(), to: /storage/NFTMinter)
    }
}
In this contract, an @NFTMinter resource is the only one that can mint NFTs. Naturally, we save this to the deploying (“admin”) account in the init function of the contract.
This is great, and the account with the NFTMinter will be able to mint NFTs just fine. But what if we want more minters?
Well, we could add a function to the NFTMinter:
			pub resource NFTMinter {
  pub fun mintNFT(): @NFT {
    return <- create NFT()
  }

  pub fun createMinter(): @NFTMinter {
    return <- create NFTMinter()
  }
}
Now the NFTMinter will be able to create more NFTMinters. The NFTMinter could sign a transaction to call the createMinter function, and then deposit the NFTMinter resource into a different account’s storage.
But is it that easy? Let’s look at the transaction:
			import ExampleNFT from 0x01

transaction() {
  // signer1 - the account with the NFTMinter resource
  // signer2 - the account receiving a new NFTMinter resource
  prepare(signer1: AuthAccount, signer2: AuthAccount) {
    let minter = signer1.borrow<&ExampleNFT.NFTMinter>(from: /storage/NFTMinter)!

    let newMinter: @ExampleNFT.NFTMinter <- minter.createMinter()

    signer2.save(<- newMinter, to: /storage/NFTMinter)
  }
}
Now, signer2 has an NFTMinter and will be able to mint NFTs all on their own now. But there exists two problems:
signer1andsigner2have to co-sign this transaction. Co-signing is not very easy to coordinate.signer2is now able to mint NFTs forever and ever. There is no taking that priviledge away if they are a bad actor.
Using Private Capabilities
This is where private capabilities come in. What if signer1 could give signer2 the ability to mint NFTs without them also having to sign, and we could take the priviledge away if they ended up being a bad person?
Let’s change up the contract a bit:
			pub contract ExampleNFT {

    pub var totalSupply: UInt64

    pub resource NFT {
        pub let id: UInt64

        init() {
            self.id = self.uuid
            ExampleNFT.totalSupply = ExampleNFT.totalSupply + 1
        }
    }

    pub resource interface CollectionPublic {
        pub fun deposit(token: @NFT)
        pub fun getIDs(): [UInt64]
        pub fun borrowRecordNFT(id: UInt64): &NFT?
    }

    pub resource Collection: CollectionPublic {
        pub var ownedNFTs: @{UInt64: NFT}

        pub fun withdraw(withdrawID: UInt64): @NFT {
            let token <- self.ownedNFTs.remove(key: withdrawID) ?? panic("missing NFT")
            return <- token
        }

        pub fun deposit(token: @NFT) {
            self.ownedNFTs[token.id] <-! token
        }

        pub fun getIDs(): [UInt64] {
            return self.ownedNFTs.keys
        }

        pub fun borrowRecordNFT(id: UInt64): &NFT? {
            return &self.ownedNFTs[id] as &NFT?
        }

        init () {
            self.ownedNFTs <- {}
        }

        destroy() {
            destroy self.ownedNFTs
        }
    }

    pub fun createEmptyCollection(): @Collection {
        return <- create Collection()
    }

    pub resource interface MinterProxyPublic {
      pub fun depositMinter(minter: Capability<&NFTMinter>) {
        // Check to make sure the capability is actually legitimate.
        // Remember `.check()` from Chapter 1 Lesson 1!
        pre {
          minter.check(): "This capability is invalid!"
        }
      }
    }

    pub resource MinterProxy: MinterProxyPublic {
      pub var minter: Capability<&NFTMinter>?

      // Anyone can call this function. However,
      // you must pass in a valid capability to an
      // NFTMinter, so realistically only the NFTMinter
      // can successfully call this.
      pub fun depositMinter(minter: Capability<&NFTMinter>) {
        self.minter = minter
      }

      init() {
        // Initially the `@MinterProxy` has no capability
        // to a NFTMinter. It should be deposited
        // later by an NFTMinter itself.
        self.minter = nil
      }
    }

    pub fun createProxy(): @MinterProxy {
      return <- create MinterProxy()
    }

    pub resource NFTMinter {
      pub fun mintNFT(): @NFT {
        return <- create NFT()
      }
    }

    init() {
        self.totalSupply = 0
        self.account.save(<- create NFTMinter(), to: /storage/NFTMinter)
    }
}
We introduced a new @MinterProxy resource and a public function to create a new @MinterProxy resource. You may be wondering, “Jacob. What the heck… why can anyone create an @MinterProxy resource now. That seems so weird.” Yeah, you’re right, it is weird, and so are you.
Anyone can create a @MinterProxy resource. But they won’t necesarrily be able to utilize it the way they want. Initially, the @MinterProxy resource’s minter capability is set to nil. However this variable has the ability to be filled with a legitimate Capability<&NFTMinter> if the NFTMinter calls the depositMinter function and gives them it. While it is true that anyone can call this function, you must pass in a valid Capability<&NFTMinter> type or the function will fail due to the pre-condition in the interface.
First, lets write a transaction for a random user to store a @MinterProxy:
			import ExampleNFT from 0x01

transaction() {
  prepare(signer: AuthAccount) {
    signer.save(<- ExampleNFT.createProxy(), to: /storage/MinterProxy)
    // Don't forget to link it to the public so that the NFTMinter can deposit the private capability!
    signer.link<&ExampleNFT.MinterProxy{ExampleNFT.MinterProxyPublic}>(/public/MinterProxy, target: /storage/MinterProxy)
  }
}
Now, the NFTMinter account must fulfill the @MinterProxy with a capability if they want to give them minting rights. The question now is, do we want this capability to be private or public? Well, private of course! If the NFTMinter created a public capability to their resource, then anyone could mint!
Let’s see how to create a private capability (it’s very similar to public) and deposit it to the @MinterProxy:
			import ExampleNFT from 0x01

transaction(minterProxyAddress: Address) {
  // signer - the account with the NFTMinter resource
  prepare(signer: AuthAccount) {
    // Link the NFTMinter to a private path
    signer.link<&ExampleNFT.NFTMinter>(/private/NFTMinter, target: /storage/NFTMinter)

    // Get the private capability (remember: can only be accessed on AuthAccount)
    let minter: Capability<&ExampleNFT.NFTMinter> = signer.getCapability<&ExampleNFT.NFTMinter>(/private/NFTMinter)

    // Get the MinterProxy from the recipient
    let minterProxy = getAccount(minterProxyAddress).getCapability(/public/MinterProxy)
              .borrow<&ExampleNFT.MinterProxy{ExampleNFT.MinterProxyPublic}>()
              ?? panic("This account does not have a public MinterProxy.")

    // Fulfill the MinterProxy's `minter` capability
    minterProxy.depositMinter(minter: minter)
  }
}
Voila! Now the @MinterProxy can mint NFTs. Let’s see how they would do that:
			import ExampleNFT from 0x01

transaction() {
  // signer - the account with the MinterProxy resource
  prepare(signer: AuthAccount) {
    // Borrow the &MinterProxy reference
    let minterProxy: &ExampleNFT.MinterProxy = signer.borrow<&ExampleNFT.MinterProxy>(from: /storage/MinterProxy)!
    // Get the capability
    let minterCapability: Capability<&ExampleNFT.NFTMinter> = minterProxy.minter ?? panic("The capability has not been fulfilled.")
    // Borrow the capability
    let minter = &ExampleNFT.NFTMinter = minterCapability.borrow() ?? panic("The capability is no longer valid.")

    // Mint the NFT
    let nft: @NFT <- minter.mintNFT()

    // ...
  }
}
Aaaaaaand we’re done!
Revoking the Private Capability
Remember we talked about wanting to potentially remove minting rights from a @MinterProxy if they became a bad actor?
Well, remember that a @MinterProxy resource really just stores a capability to a @NFTMinter. And as we know, a capability is really just a pointer that can be revoked at any time by its owner.
If a @MinterProxy became malicious, we could simply unlink our private capability:
			transaction() {
  // signer - the account with the NFTMinter resource
  prepare(signer: AuthAccount) {
    signer.unlink(/private/NFTMinter)
  }
}
… and now all of the capabilities inside @MinterProxy resources are completely invalid. They can no longer mint.
Quests
- In the very last transaction of the Using Private Capabilities section in today’s lesson, there was this line:
			// Borrow the capability
let minter = &ExampleNFT.NFTMinter = minterCapability.borrow() ?? panic("The capability is no longer valid.")
Explain in what scenario this would panic.
Explain two reasons why passing around a private capability to a resource you own is different from simply giving users a resource to store in their account.
Write (in words) a scenario where you would use private capabilities. It cannot be the same NFT example we saw today.
Architect and implement your idea in #3. Show:
- at least one example of you
linking a private capability - at least one example of you storing the private capability inside a resource
- an example of you revoking (
unlinking) the capability and showing the capability is now invalid